Your new HP printer is ready to go, but there’s one hurdle standing between you and that first wireless print: getting it connected to your WiFi network. Whether you just unboxed a brand-new device or moved your existing printer to a different room, knowing how to connect HP printer to WiFi is essential for cable-free printing from any device in your home or office.
The good news? HP offers several connection methods, and most take less than 10 minutes once you know the steps. You can use the HP Smart app on your phone, navigate the printer’s built-in setup wizard, or connect directly through WPS push-button mode if your router supports it.
At 123.hp.com/setup, we specialize in breaking down HP printer installation into clear, actionable steps. This guide walks you through each connection method so you can choose the one that fits your setup and start printing wirelessly right away.
What you need before you start
Before you learn how to connect HP printer to WiFi, you need to gather a few essential items and confirm your setup is ready. Taking five minutes to verify everything saves you from mid-installation frustration when you discover a missing password or incompatible hardware. Most connection failures happen because users skip this preparation step and jump straight into the setup process.
Check your WiFi network information
You must know your WiFi network name (SSID) and password to complete any wireless connection method. Write down both pieces of information exactly as they appear, including capital letters, numbers, and special characters. Your router typically displays this information on a sticker attached to its bottom or side panel.
If you’ve changed your WiFi password recently and can’t remember it, check your computer’s network settings or contact your internet service provider.
Finding your network details on a Windows computer takes seconds: click the WiFi icon in your taskbar, select your current network, click Properties, and check the box labeled "Show characters" next to the Network security key field. Mac users can find saved passwords through Keychain Access in the Utilities folder.
Confirm your printer model supports wireless
Not every HP printer includes built-in WiFi capability. Check your printer’s control panel for a wireless icon (it looks like a radio signal or antenna) or inspect the back panel for an Ethernet port, which indicates network capability. Models without screens often have a wireless button marked with a WiFi symbol.
Visit the HP Support website and search for your printer model number (found on the front or inside the printer) to verify wireless specifications. The product page lists all connectivity options under "Technical Specifications" or "Connectivity."
Gather your necessary devices
You need one of the following devices to complete the connection process:
- A smartphone or tablet (iOS or Android) for the HP Smart app method
- A computer (Windows or Mac) with the HP Easy Start software installed
- A WiFi router with a physical WPS button for push-button connection
- A USB cable (type A to B) for temporary connection during setup
Keep your printer’s power cable plugged in and the device turned on throughout the entire process. Place your printer within 15 feet of your WiFi router during initial setup to ensure a strong signal.
Step 1. Connect with the HP Smart app
The HP Smart app provides the fastest and most intuitive way to learn how to connect HP printer to WiFi, especially if you’re already using a smartphone or tablet. This method works across all modern HP wireless printers and takes roughly five to eight minutes from download to completion. You can manage everything from a single interface without needing to navigate confusing printer menus or remember complex network settings.
Download and open the HP Smart app
First, install the HP Smart app from your device’s official app store. iOS users find it in the Apple App Store, while Android users download it from Google Play. The app requires iOS 14.0 or later, or Android 7.0 or higher to function properly.
Open the app after installation and grant permissions for location access, which helps detect nearby printers automatically.
Sign in with your existing HP account or create a new one using your email address. Your account saves printer settings and enables remote printing from anywhere with internet access.
Add your printer to the network
Tap the plus icon (+) or "Add Printer" button on the app’s main screen. The app scans for available HP printers within range and displays them in a list within seconds.
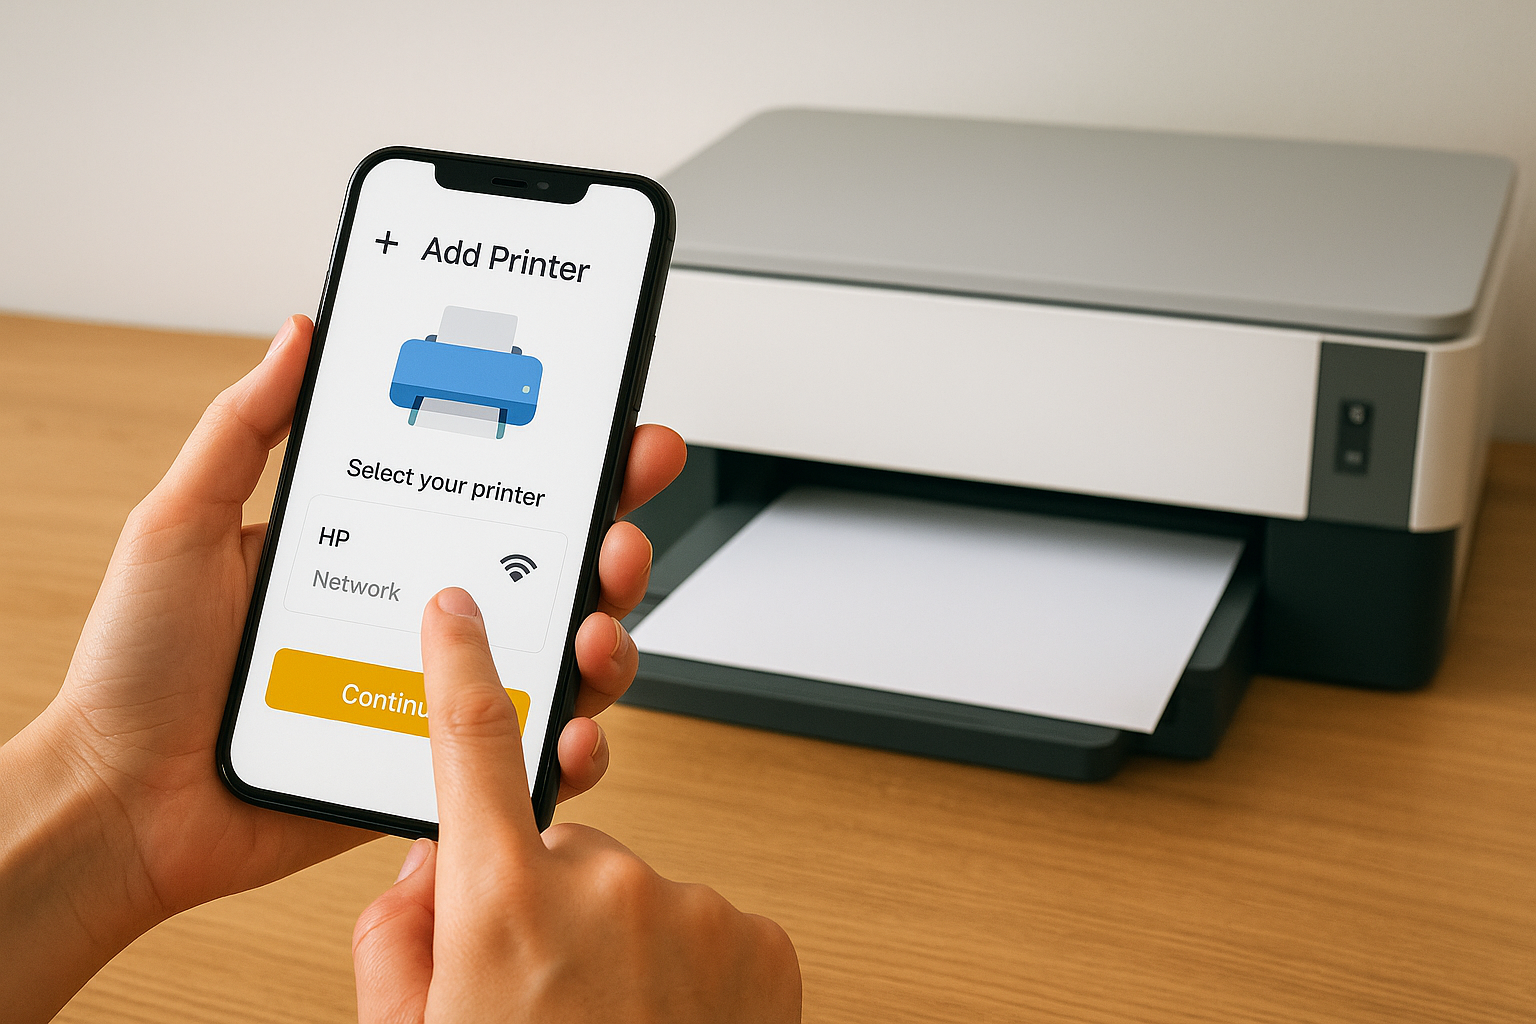
Select your printer model from the detected devices, then follow these prompts:
- Confirm your printer model matches the one displayed
- Select your WiFi network from the available networks list
- Enter your WiFi password exactly as it appears, including capitals and symbols
- Tap "Continue" or "Connect" to complete the setup
The printer restarts automatically and connects to your network. A confirmation screen appears when the connection succeeds, and you can send a test print immediately.
Step 2. Connect from the printer control panel
Printers with built-in touchscreens or button menus let you configure WiFi directly from the device itself, which becomes useful when you prefer not to download apps or software. This method gives you complete control over network selection and troubleshooting without relying on external devices. Most HP printers with displays include a dedicated Wireless icon that launches the setup process with a single tap.
Access the wireless setup wizard
Your printer’s control panel provides direct access to WiFi configuration settings through the Wireless menu. Touch the Wireless icon (looks like an antenna or radio waves) on your printer’s display, or press the Wireless button if your model uses physical buttons instead of a touchscreen.
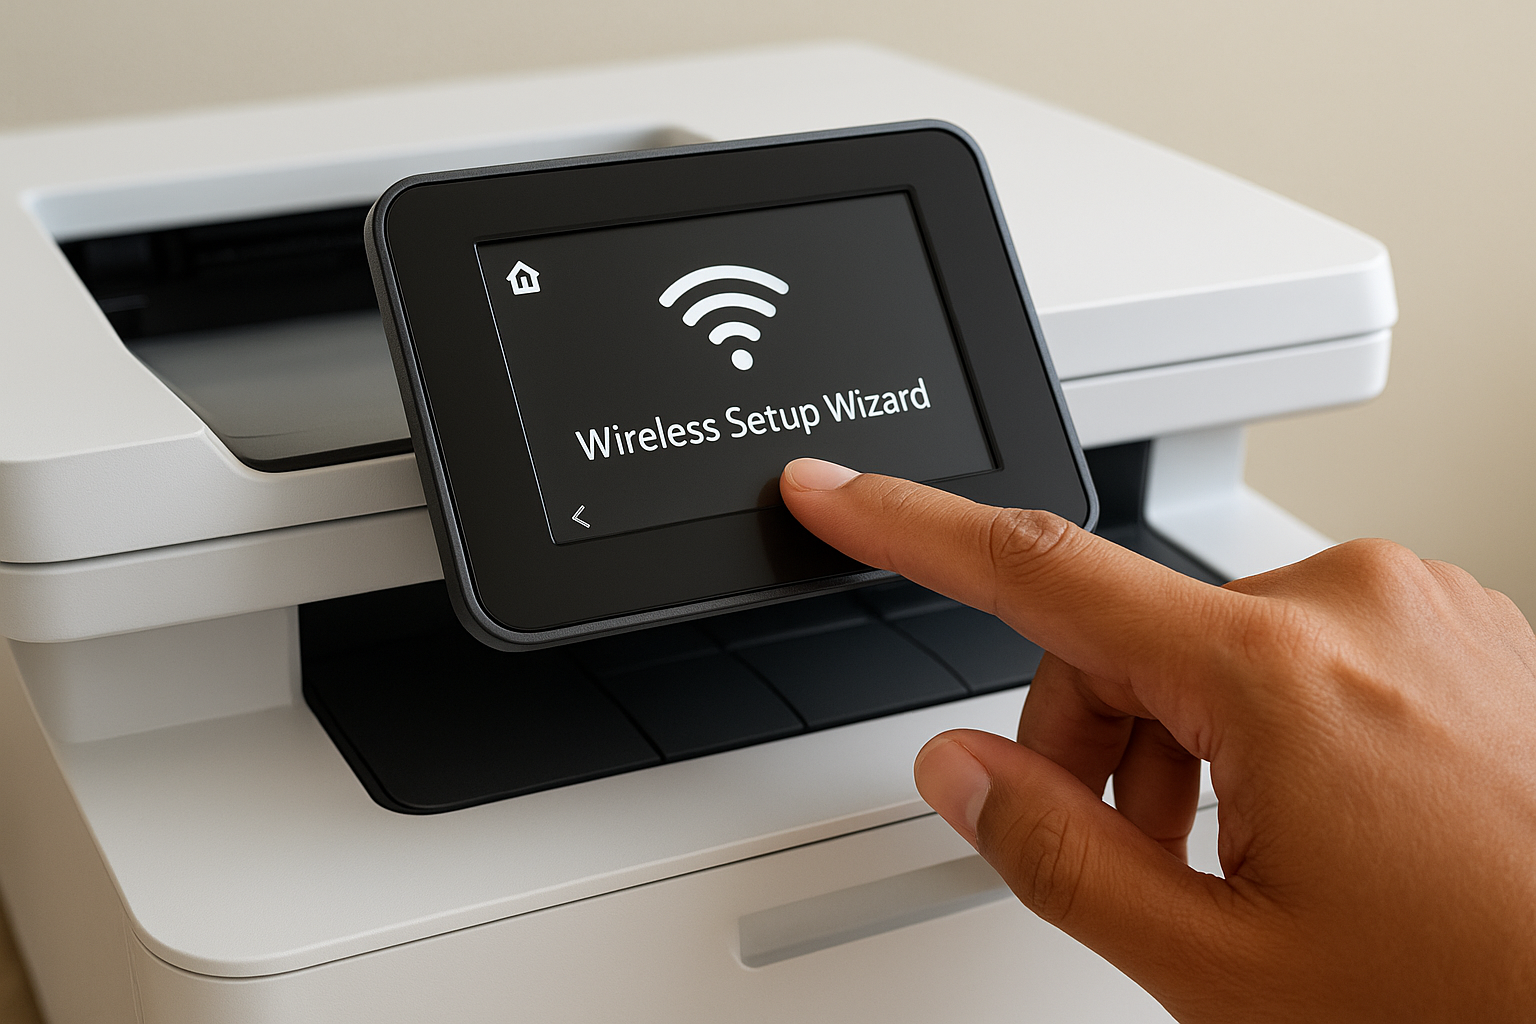
Navigate to Settings or Setup, then select Network Setup or Wireless Settings from the menu options:
- Tap or scroll to "Wireless Setup Wizard"
- Wait while your printer scans for available networks (takes 10-20 seconds)
- View the list of detected WiFi networks on your screen
The setup wizard automatically searches for all networks within range, so you don’t need to manually enter your network name.
Select your network and enter credentials
Once the scan completes, locate your WiFi network name (SSID) from the displayed list and select it. Your printer prompts you to enter the network password using the on-screen keyboard.
Type your password carefully using the touchscreen keyboard or arrow buttons, paying attention to uppercase letters and special characters. Select "Done" or "OK" after entering credentials, then wait while your printer attempts connection. A confirmation message appears within 30 seconds when you successfully connect, and the Wireless icon displays solid blue to indicate an active connection.
Step 3. Connect without a screen using WPS or USB
Printers without displays still offer reliable connection methods that bypass manual network configuration entirely. These alternatives become essential when your printer lacks a touchscreen interface or when you want to skip typing passwords on tiny button panels. Both WPS push-button mode and temporary USB connection work on most screenless HP printer models and complete the setup in under five minutes.
Connect using WPS push-button mode
Your WiFi router must have a physical WPS button (usually labeled "WPS" or displaying a lock icon with wireless waves) for this method to work. Locate the Wireless button on your printer first, which typically sits near the power button or on the control panel.
Press and hold the Wireless button for three seconds until the wireless light begins flashing blue, indicating your printer entered WPS mode. Within two minutes, press the WPS button on your router and hold it for three to five seconds.
The printer and router exchange network credentials automatically without requiring you to enter any passwords.
Both devices connect within 30 seconds, and the printer’s wireless light stops flashing and remains solid blue when successful.
Connect temporarily with USB cable
You can establish WiFi settings using a USB Type-A to Type-B cable (the same type used for traditional printer connections) when WPS isn’t available. Connect one end to your printer’s USB port and the other to your computer’s USB port.
Download HP Easy Start from the official HP website and launch the software. Select "Wireless" when prompted for connection type, then follow the on-screen instructions to configure your network settings. Once your printer connects to WiFi successfully, disconnect the USB cable and print wirelessly from any device.
Fix problems if your printer won’t connect
Connection failures happen even when you follow every step of how to connect HP printer to WiFi correctly, and most issues stem from router settings or temporary network conflicts rather than printer defects. Your printer might fail to detect networks, reject valid passwords, or lose connection immediately after setup completes. These problems typically resolve within minutes once you identify the specific cause and apply the correct solution.
Check the basics first
Before diving into advanced troubleshooting, verify that your printer sits within 15 feet of your WiFi router and no thick walls or metal objects block the signal path. Physical distance and interference cause 80% of initial connection failures according to HP support data.
Confirm these essential requirements:
- Your WiFi router broadcasts a 2.4 GHz network (many HP printers don’t support 5 GHz-only networks)
- The wireless light on your printer blinks or glows blue (solid orange or red indicates hardware issues)
- You entered your WiFi password exactly as it appears, including capital letters and symbols
- Your router hasn’t reached its maximum device limit (disconnect unused devices temporarily)
Restart both your printer and router by unplugging them for 30 seconds, which clears temporary network conflicts in most cases.
Reset network settings
Your printer’s network settings may contain incorrect information from previous connection attempts that prevent new setup processes from succeeding. Press and hold the Wireless and Cancel buttons simultaneously for three seconds on printers without displays, or navigate to Settings > Restore Network Defaults on touchscreen models. This action removes all saved network data and lets you start the connection process fresh without residual configuration errors interfering with your setup.
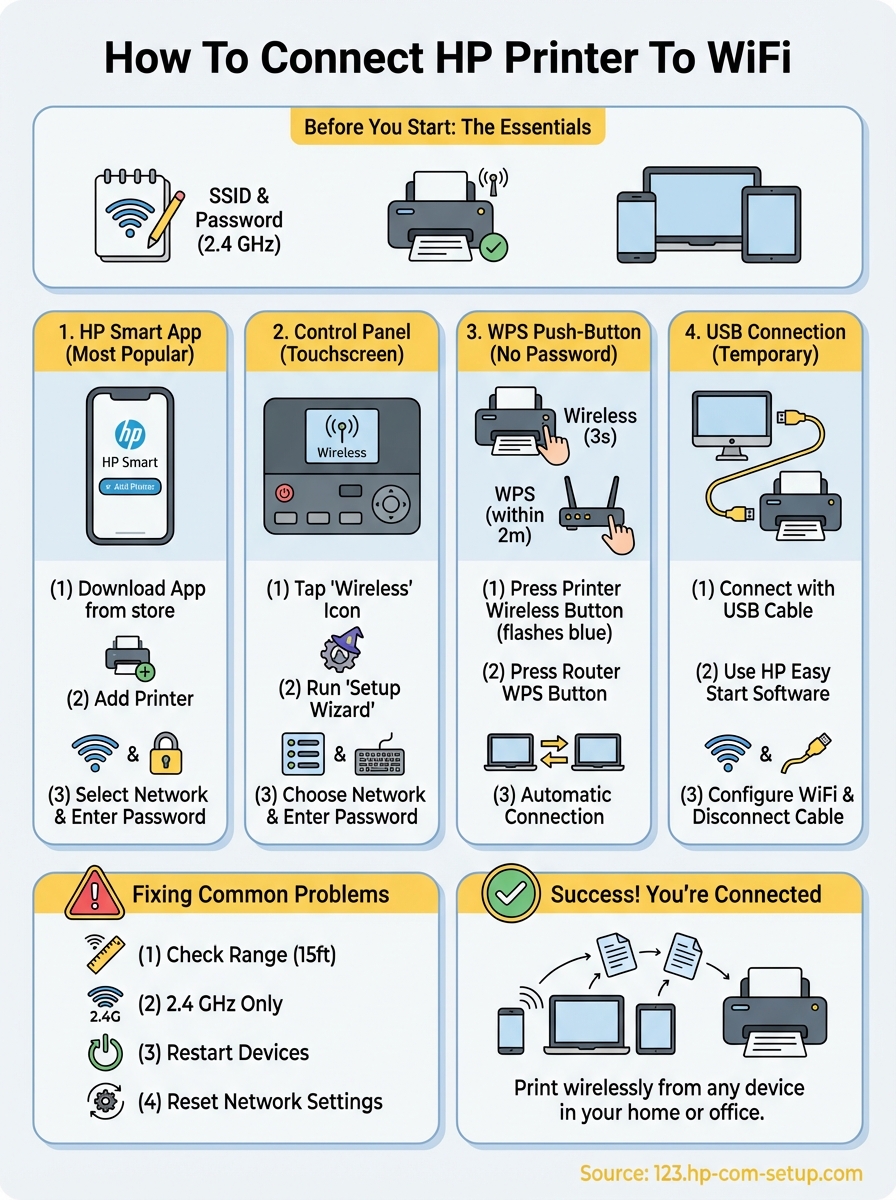
You’re ready to print wirelessly
You now know how to connect HP printer to WiFi using multiple methods that work for any model, whether your printer includes a touchscreen, basic buttons, or no display at all. Your wireless connection stays active as long as your router remains powered on and your printer sits within range of the network signal. Most printers reconnect automatically when you turn them on after periods of inactivity.
Print from your smartphone, tablet, or laptop without plugging in cables every time you need a document. The HP Smart app lets you send print jobs from anywhere in your home, scan documents directly to your phone, and monitor ink levels before you run out mid-project. Your printer responds within seconds once it receives wireless commands from connected devices.
Need help with other HP printer setup tasks like driver installation, scanning configuration, or troubleshooting error messages? Visit 123.hp.com/setup for step-by-step guides that walk you through every aspect of HP printer installation and maintenance, from initial unboxing to advanced wireless configuration.